If you’re just starting with DTG, you might be unsure about a few things…
- What software to use?
- How long will it take to learn?
- Do I have to be an Artist?
- What if I’m not very creative?
- Is that software free, or is it going to have to cost you an arm and a leg?
Maybe you have an artist friend willing to help you with artwork, or you plan to source it out.
During this video, you’ll see Jerid use Adobe Photoshop, one of the most popular graphics applications used as a T-Shirt design software. (But you could also use free software, like Gimp).
Whether you’re creating the graphics yourself or editing other people’s graphics, here are a few tips to help you get started:
Keep it simple
The details of the image are important but don’t try to fit everything in the image. Often the most simple images or logos have the greatest impact. This is also true for colors.
Choose the right colors
What color of blank you’re printing on matters. But also choosing complementary colors.
Know your audience
Whether you’re creating your image or sourcing them, who is your target market? Is the design something they’ll want to wear? Do a little market research and write down who your audience is, what they like, and what other brands they might wear.
Resolutions
When you’re looking on the internet for images most of those images are 72 pixels per inch (ppi). In the printing world, we use dots per inch (dpi).
Looking at a file in Photoshop it may appear very pixelated, because, for example, it’s only 3 inches wide (216 pixels) with a resolution of 72 ppi. This is considered a low-resolution file. For printing, you want and need a higher resolution.
If we increase the size of the photo we start to see all the pixels. What we don’t want to do is distort the pixels. Photoshop tries to interpret the pixels the best that it can. However, because it’s such a low-resolution file and you’re trying to increase the file size, it’s going to look distorted.
In Photoshop we can go into the image information and change the ppi from 72 to 300. We can also increase the image size from 3 inches wide to 10 inches. Comparing the original image and the new one, Photoshop does the best it can to fill in the pixels.
On the other side, if you start off with a high-resolution image and size it down, it stays crisp and defined.
Text
If you’re creating an image with just text, you can start a new file and create it at the size you’d like to print. For example, you may want an image 10 inches wide, with 300 ppi.
You also will likely want a transparent background for your design. Once you create the new file, you’ll see a checkerboard pattern to indicate there’s no color in the background. To the right of the screen, you’ll also see a layer’s pallet, that shows layer one with a checkerboard pattern.
To create the text, select the text option from the left-hand menu and click someone on your file area. From there you simply need to type in your first word.
To change the color of the text, go to the Properties tab (right-hand side). From there you can select a color from the pallet, or type in the RGB code for the color (example, Red’s code is R=250, G=0, B=0). These codes can be found with a simple online search.
You can also change the font style under the Properties tab.
Once you have the font style you like, you may find the wording extends out beyond the width of the image. Here you have two options:
1. Change the font size under the Properties tab.
2. Under Edit, select Free Transform. This allows you to size up the text (or image) or down to fit your area.
Once your text is complete, you can go in and create other elements and layers. For example, under your red lettering, create a block of red and input white lettering.
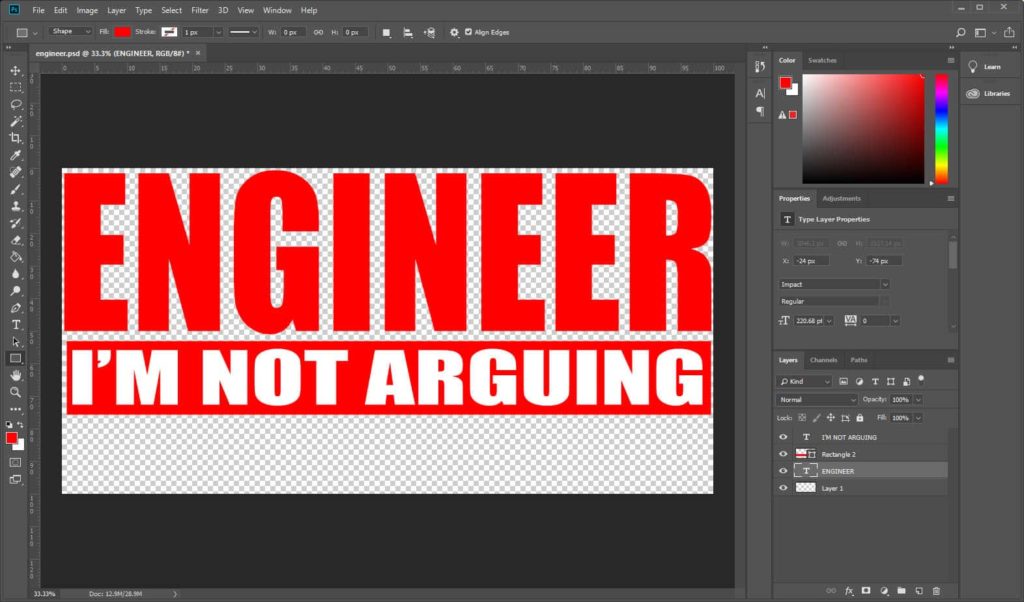
In our image above, if we want to move the red bar and the corresponding white text down together, we need to group them. You hold the shift key and select both the layers under the Properties tab.
In our example here, instead of having the text white, we can make that lettering transparent. This way whatever color of t-shirt you print on will show through instead of printed white lettering.
To do that:
1- Right click on the layer (from the Properties tab) and select Rasterize Layer.
2- Hold the Control key and click on the Text layer again (T icon).
3- Click on the Eye icon, next to the T to shut off the lettering.
4- Select your Rectangle layer and click the Delete key.
Now you should have a reversed out image.
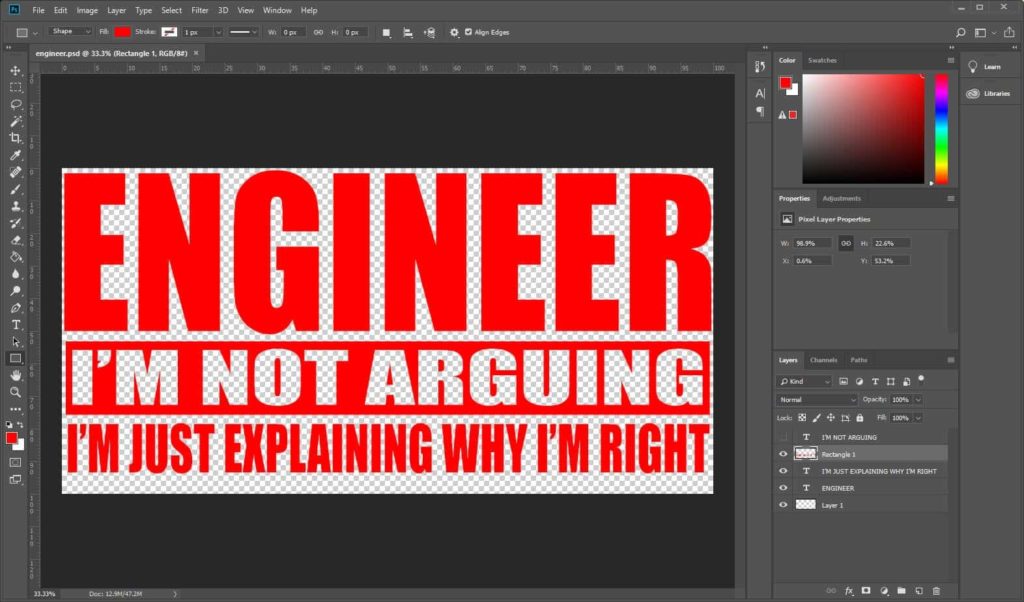
Once you have your final design, you can save to edit again later. Or you can merge into one layer.
To merge layers, right click on any of the active layers in the Properties tab and select Merge Visible.
Photos
Many photos would not print very well because of the multitude of light, mid, and dark tones. Quite often with DTG printing, the tones blend too much.
Another aspect to look at when considering photos is whether they have a colored filter over the top. Often when editing images for Instagram or another sharing service the images get a filter such as pink or orange. Unfortunately, this is not ideal for printing onto shirts.
When you resize an image, you want to ensure you don’t have any image loss. By unselecting the “Resample” option, when you resize the image – whether it’s width or height – the other aspects will change with it, including the resolution.
For example on a 41-inch wide image, at a 72 dip, resizing it to 10 inches automatically changes the dip to 300.
Once you have the image size you want, you can next get rid of the tone. There are some automatic options you can try out to see if they will fix the tone for you.
Selecting Image at the top of the screen pulls up options for Auto Tone, Auto Color, and Auto Contrast. If your image appears to have a colored filter or tone to it, selecting Auto Tone may get rid of it for you automatically.
If you need to take the image further to ensure proper contrast and separation of color, again select Image from the top menu, then select Adjustments and Levels.
There are two nodes on either side. The left is the dark node, and the right one is the light node. By sliding either one of them, you can see how it affects the image.
Doing this is the easiest way to adjust the image for printing. Taking the dark node, slide it to where the graph above the node just starts to angle upwards. You can then do the same thing with the light node, sliding it towards the left. Watching your picture, you can start to see if you’ve moved it too far.
There’s a third node in the middle for your mid tones, and you can adjust that, moving it to the right to go a little bit lighter.
Another thing we like to do with images is going to the Filter tab and go to Sharpen. Then select Unsharp mask. This helps to sharpen the image. Going too far will make the image look awkward, but you can play with the slider to see if adjustments to improve the image.
Often on a t-shirt, a slight increase in sharpness makes the image look really good.
Photo with Image
Start off with all the instructions from the previous section to resize the image and adjust the dip.
To add a border to that image you want to find the center of the image. If you click and drag from the left-hand side of the screen, it will snap to the center. You can also change your ruler to a % and find where the 50% point of the image is. You can do this on both the X and Y axis to find the center.
To create the border, select the rectangle tool from the left-hand menu. Then by clicking on the center of the image, and holding the Alt key, you can drag the border, and it will move the border in all directions from that center point.
This creates a fill, which will cover your image. Going to the Properties tab on the right, you can click on the Fill to turn it off.
The click on the border and adjust the pixel size of that border.
You can then go ahead and create a second border on the image. To do this, you can duplicate the existing border by selecting the layer and dragging it down to the bottom.
You’ll want to hold the Shift key as you move and adjust the border to be either inside or outside the existing border. Holding the Shift key ensures that all areas of the border are moving at the same time and you have the exact spacing on all four sides of your border.
From there, you can adjust the pixels of that border to be larger or small than the original border.
To add text, add a new text layer and start typing. Follow the instructions from above to fit the text into your image and edit your font.
If you double-click on the Text Layer in the Properties tab, you can make additional adjustments to your text. For example, your text is white, but the image behind has some white clouds, and so it doesn’t stand out. You can select drop shadow to add contrast to your text. From there you can change the angle, distance, and size of the shadow.
All of these adjustments are fairly subjective and will take some playing around to get the image where you feel happy with it.
It’s all a matter of learning the tools and using them to your ability.
Great Options for Additional Training
For more help getting yourself up and running with Photoshop and other image editing software, check out these tutorials:


