When we think about direct to garment printing or making a digital transfer, we often think about doing one off designs with lots of color or photo realistic prints.
That’s one of the reasons what people adopt digital technologies, vs screen printing for example, but not the only one by far.
What digital printing is really about is giving your customers what they want, not about forcing them into a decoration method that requires lower colors or higher quantities to make sense.
Being able to variably size a graphic for different size shirts, regardless of the quantities of each, is another reason digital is taking over the custom t-shirt printing business.
The 8, 10, 12 Principal for Digital Garment Printing
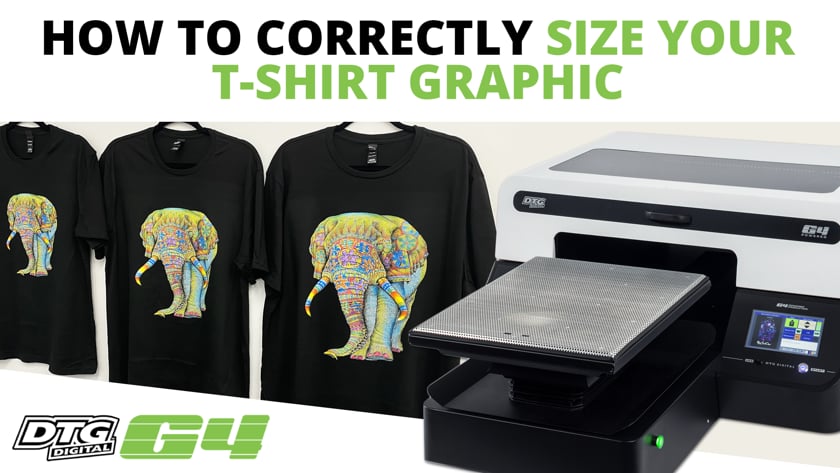
In the example below we have chosen a full color graphic for a dark/black garment. The shirt sizes we are using are a small, a large and an XXL (2XL).
Measuring the shirts we used here across the front from the bottom of the left armpit to the right we get the following measurements.
- Small shirt – 17”
- Large shirt – 19”
- 2XL shirt – 23”
Imagine applying the same size graphic to each shirt… and how different they would look!
It is very difficult to design a graphic that is “one size fits all” for this scenario. Having said that, most screen printers would simply use a 10” graphic and be done with it. Because there’s no way you’re going to set up 3 different size prints for the same graphic unless the quantities are HUGE. The set up cost for each is just too great.
But, with digital, it is easy to quickly adjust the size of your graphic to better fit the garment and create a more consistent look across all sizes of shirts.
Printing the same graphic – 3 different sizes
We wanted our graphic to roughly cover ½ of the width of the shirt at the armpits.
Small/Medium T-Shirt
8” wide graphic
Large/X-Large T-Shirt
10” wide graphic
2XL/3XL T-Shirt
12” wide graphic
As you can see from the images of the 3 shirts they look consistent and would be difficult to determine the size of the shirt if they were not photographed next to one another.
That is exactly what we are trying to achieve.
In the picture here we see the 2XL shirt with the 12” graphic on it pictured next to a 2XL with an 8” graphic on it to accentuate how much graphic size relative to shirt size can affect the look of your finished product.
If you have children’s size shirts and/or even larger plus size shirts you can simply expand out to smaller and larger size graphics (6” for children’s sizes or even 4” for infant sizes and 14” or larger for 4XL+ size shirts).

It becomes important that you calculate in the added cost of shirts as well as ink cost when you start doing oversize shirts. There are two approaches to how to quote in situations like this:
The first approach would be to simply add $3 to the cost of the plus size shirts. This will cover your added ink and garment pricing but does not add any profit and certainly does not allow for mistakes on the larger size shirts. Iit can also be a put off to customers who may be ordering a large number of plus size shirts (and especially so if the one actually doing the ordering is a plus size!).
Another approach would be to get the size breakdown of all of the shirts and add up all of your shirts costs and ink costs and then quote the job based on total costs plus your profit margin then divide by the number of shirts for a per shirt price.
This allows the extra costs of the garments and inks on the plus size shirts to be absorbed into the entire order without a line item extra charge for oversize shirts.
Winning Customers with Digital Printing T-Shirts
Either way, can you see how right-sizing the graphics to match the shirt size might win you customers? Loyal customers?
Think about the customer that has a big family reunion coming up and needs a small number of kids shirts, a bigger number of larges and 10-12 XXL or XXXL shirts? Compare the solutions that a traditional screen printer is going to offer.
Now – who do YOU think they’ll want to do business with?

Digital + Analog Printing
One other application of “right-sizing” is in conjunction with screen printing.
For large orders you can still use your screen-printing equipment to print the core sizes and use your digital printer to print the over sizes and under sizes.
This allows you the benefit of the efficiency and cost savings of screen-printing while also extending the courtesy of right-sized graphics to your customers with your digital printer on large orders.
Right sizing, or matching your graphic size to the shirt size, is an important advantage in digital garment printing. The example we used here was using a G4 Direct to Garment printer from ColDesi. But the exact same methodology can be used with a white toner transfer printer like the DigitalHeat FX 9541, OKI pro8432 or i550.


